January 3, 2005:
The first 'transaction' of the new year... I received some gift certificates for Year One for Christmas (man, my family knows what I like!). I decided to use them to purchase some new assembled front door panels, as my originals are starting to show their age. The originals look like plain white, although from what I have read, 'white' was not available in 1968. The closest I could find is 'Pearl' (basically, white with a tint to it). In all, a good start to the year...
February 17, 2005:
To continue on my trek to get this beast rolling, I ordered some more interior bits (from Year One, of course). I ended up ordering assembled rear panels (to match the front door panels) and other tidbits like interior door handles, arm rest bases and pads, an interior screw kit, and door panel/window crank removal/installation tool.
February 23, 2005:
Well, I have since received my back-ordered front door panels, and all of the interior bits mentioned in the above post (with the exception of the assembled rear panels, which are back-ordered). I must say, I am a little disappointed. The 'Pearl' just doesn't do it for me. I decided that I wanted to do a different interior color (black), as it would match my hopeful exterior color a little better (a metallic gun metal gray). I ended up RMA'ing my front door panels (to be reordered in black at a future date), and RMA'ed the arm rest pads and bases (also, to be reordered later). While I was at it, I cancelled the order for the Pearl rear panels, and reordered them in black. Hopefully this gamble pays off...
March 1, 2005:
I decided today, that with all of the shit in my garage (you know, the so-called 'two car garage' that you can only fit two cars if they are both Volkswagens), I will not be able to do this whole 'restification' thing. Yeah, I COULD do it, but it is getting to be a pain in the ass. The car isn't even apart yet, and it is already a pain. Every time I want to do something that requires floor space (i.e. welding), I have to back the Firebird out, do my business, then move the car back in. That won't really be possible when it is all torn a part. Well, it would be if my driveway wasn't so damn steep... If it were level, I could use little dollies to roll the car on, or a rotisserie... In any case, I decided to do some concrete on the side of my house (the side between our house and the neighbor's, not between the house and the road). Here is the area I am going to concrete:
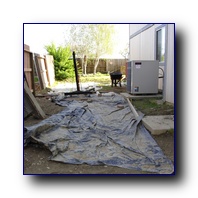 |
It will be perfect... The area will start out at 8' wide (leaving 1-1/2' between the fence and the concrete, in case I have to redo any fence posts, and also leaving 1-1/2' between the house and the concrete). This area is about 20' long. Then, it opens up to 12' wide (leaving the same clearances on the sides between the concrete and the fence/house). This section is about 25' long. Awesome... I decided to call the local rock yard and get a quote for concrete delivery (we will do the work ourselves). It wasn't too bad... $700, for enough concrete to fill that area at 4" deep. I have a lot of prep work to do though, with clearing the area and all...
A few months ago, I bought an adjustable gate frame at Home Depot. It supposedly would expand out to 7' wide, and you just screw/bolt some 2x4s to it to fix it's position and give it rigidity. That gate turned out to be a $90 piece of shit. Check out these pics of this hunk-o-garbage as it sits now:
 |
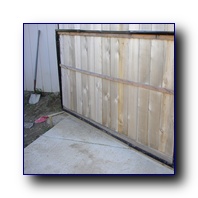 |
See, I tend to go overboard on things, making them entirely too beefy. Better to have too much than not enough (except in the case of solder... "The bigger the blob, the better the job" just doesn't work with modern electronics...). The pre-fab gate was designed to be hung from single 2x4s rooted in the ground... Yeah, right. I used 3x3 square steel tubing, with either a 1/8" or 1/4" thick wall (I can't recall) for the two upright posts on the end of the gate.
 |
The gate still drooped a lot when you open it. I figured that I had too much weight, with the 2x4s, then all of the slats... So, I took the 2x4s out, and put in 1x2. Still drooped... Next, I tried removing the wood altogether, and welding the joints, so that there would be no need for the wood. Still droops. Basically, the 1x1 tubing used on this damn gate frame has something like an 18-gauge wall thickness. CRAP, absolute crap...
 |
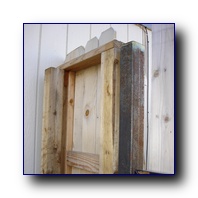
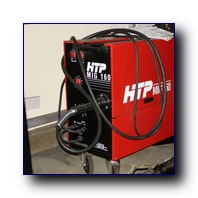
When I bought this gate, I was unsure of my welding abilities, so it never really ocurred to me to fab one myself. After seeing this abomination in action, I decided to take matters into my own hands. Break out the HTP MIG160...
 |
A trip to the neighborhood scrap steel yard netted me some 1x1 square 14-guage tubing, 2x1 rectangular 14-gauge tubing, and 20' worth of 4x4 square tubing with 1/4" wall. I welded up some simple, yet rigid, gate frames (I decided to go with a double gate that spans 8', instead of a single gate that is 7' across), and used some 1/8" thick plate steel to fab a cover for the tops of the end-posts. That should keep water of the poles... Here is the plan for the new gates.
After welding the gate frames together, I then used POR-15's rust-preventitive paint to keep the poles and the gates from rusting...ever. That process was actually a real pain in the ass because even though POR is meant to paint right over rust, I was using it on bare metal. The process went a little like this:
1) For the poles, I had to use some flap discs to get the entire length of both poles down to bare metal (there was some weird deposit on all four sides of each pole).
2) I then used POR's Marine Clean to clean all of the oil off of the poles. The poles were rinsed and left to dry.
3) Then, it was necessary to etch the poles, to give the POR something to stick to. I used POR's Metal Ready for this. Spray on, let sit for 20-30 minutes, then rinse and dry. Considering that I had to do this each of the four sides (independently), this took a bit of time.
4) Apply POR-15. Let dry. This stuff is awesome... It is so thick and goes a long way.
5) Since these items were to be outside, exposed to the sunlight (and POR is UV sensitive), I needed to apply a topcoat. I chose POR's BlackCote, as it is tough as nails.
 |
The procedure was the same for each gate frame.
 |
I did learn one thing through this whole process... Always use a different color primer (the POR) and topcoat (the BlackCote). When I ordered this stuff, I ordered black POR and black BlackCote (go figure!). Anyways, it was really hard, when applying the BlackCote to see where I had already used it, as everything was black. Next time, I will use the gray POR with the BlackCote...
It is going to take me a while to actually get this gate installed. When I did the crappy gate, I used a lot of concrete and the poles are pretty far into the ground. I went outside a few days ago, in an attempt to get the old poles out, but my air hammer just wasn't much to break up the concrete. I need to find another way...
To make it worse, I can't really dedicate as much time as I would like to this project, as I have another one that just cropped up. Actually, it has been in the works for years, before we even moved into this house. The fence between my neighbor's and my house finally rotted into oblivion and is leaning really bad.
 |
When they built this house (in 1994), they used 6' untreated 4x4s for the poles. The concrete that they were set it only measured about 8" around, and was only set in the ground about 10". Now, the concrete wasn't the problem. In fact, I had a helluva time getting it out, even though there wasn't much concrete to speak of. It was rooted really well into the ground. What screwed us what the materials used to make the fence. The untreated wood was completely rotten, and gave way. When taking the old panels off, the rotten wood was disintegrating to the point that I couldn't reuse any of it. So, in addition to redoing the poles, I just decided to redo all four panels. I started repairing it yesterday, but it is slow going...
It may look weird, mixing the old fence with new panels, but seeing how much work it took just to do the one pole and panel yesterday, I am not in a big rush to do the others.
The previous owners of our house, and our neighbors, were all about jury-rigging shit, so all of our fences (except the one facing the street) have metal rods holding them up (similar to what is used for a chain-link fence). I hate people like that... I spend more time fixing that jackass's jury-rigging, half-assed 'craftsmanship' than I do actually getting to build something fresh.